Troubleshooting
API Key
It's a good practice to use API key to limit the access to your full node's rest endpoints.
API Key Setup
Please add the following to your user.conf by replacing the zeros with your own key (>= 32 characters).
alephium.api.api-key = "--- your own key with >= 32 characters"
Restart your full node to make this take effect.
API Key Generation
On Mac / Linux, run:
cat /dev/urandom | tr -dc 'a-zA-Z0-9' | fold -w 48 | head -n 1
Use API Key
Swagger UI
- Click on the
Authorizebutton on the top right of your Swagger UI:

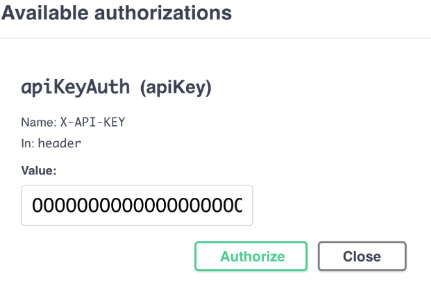
- Fill in the value box with your key and click the authorize button:

Now you could use Swagger UI as if there is no API key.
Curl
Specify the X-API-KEY header, e.g.
curl -H "X-API-KEY: ${your-api-key}" ${your-full-node-host}/infos/version
How to make the full node API publicly accessible?
-
Set up your API key properly following the guide above.
-
Add the following to your
user.confand restart your full node.
alephium.api.network-interface = "0.0.0.0"
How to access the Swagger UI of my full node on another computer in the same subnet?
- Add the following to your
user.confand restart your full node.
alephium.api.network-interface = "0.0.0.0"
- Change the
hostof Swagger UI to be the subnet IP of your full node.
Error "java.lang.AssertionError: assumption failed"
This error often occurs due to connection loss during node synchronization and means that some of the files are corrupted. To fix the problem:
-
Delete the
dbfolder under${ALEPHIUM_HOME}/${NETWORK}. e.g.rm -rf ~/.alephium/mainnet/db -
Restart the node and wait for synchronization.
Moving the Alephium data folder
Many users prefer to keep the Alephium data folder on a different disk than the primary boot disk. To do so with the Alephium full node jar, you can use the ALEPHIUM_HOME environment variable:
- Stop the Alephium full node jar
- Move the Alephium data folder (normally at
%userprofile%\.alephiumfor Windows or~/.alephiumfor Linux and macOS) to the new location - Add an environment variable
ALEPHIUM_HOMEto the system pointing to the new location. You can either do this at the system level or simply create a batch file that sets the variable prior to starting the Alephium jar. - Restart the Alephium node
If using the docker full node, then simply change the mounted folder definitions in the docker file to point to the new home then restart.
Customize Logging
There are several environment variables used for logging:
ALEPHIUM_LOG_LEVELcould change the console log level.ALEPHIUM_ENABLE_DEBUG_LOGGINGcould enable debug logging.ALEPHIUM_HOMEcould change the home folder of the full node, therefore the folder of logs
Below is an example with all of the possible logging options:
ALEPHIUM_HOM=<folder> ALEPHIUM_LOG_LEVEL=<DEBUG | INFO | WARN | ERROR> ALEPHIUM_ENABLE_DEBUG_LOGGING=<true | false> java -jar alephium-x.x.x.jar
It's also possible to override the logging configuration file of Alephium.
java -Dlogback.configurationFile=/path/to/config.xml alephium-x.x.x.jar
Pruning
A fully sync-ed Alephium full node requires more than 80 GB of disk space to store blockchain data. Since
version 2.6.1 the Alephium full node supports storage pruning which can significantly reduce the storage
requirement.
Here are the steps to prune the Alephium full node:
Using Jar File
- Make sure the Alephium full node is stopped
- Download
alephium-tools-x.y.z.jarfrom https://github.com/alephium/alephium/releases - If you changed the default Alephium home directory, set the
ALEPHIUM_HOMEenvironment variable - Run the following command
java -cp alephium-tools-x.y.z.jar org.alephium.tools.PruneStorageto start pruning - Wait until the command finishes execution, the disk space should be reduced to around 20 GB
- Restart the Alephium full node
Using Docker
- Make sure the Alephium full node is stopped
- Run the following command
docker run -it -v ${YOUR_ALEPHIUM_HOME}:/alephium-home/.alephium alephium/alephium-tools org.alephium.tools.PruneStorage - Wait until the command finishes execution, the disk space should be reduced to around 20 GB
- Restart the Alephium full node